Friday, 15 March 2019

MARMALADE CAKE OF RICE FLOUR


Other day I started making cake without realising that I was almost out of white flour in the house. I was left just with barely one fourth cup of it.  It was raining with cats and dogs and I didn’t have any will to step out.  Since I had already mixed eggs and sugar, cake had to be made.  I started looking into my pantry and found rice flour. Thought for a few minutes and concluded that rice flour seems light so let me take a chance. So I made this cake with leftover white flour and rice flour.  I was having a peek in the oven more than usual. Expecting cake to be like a flat bread.  After 35 minutes when I took it out of oven, I was amazed and thrilled to see a beautiful sponge cake. It was fluffy, lighter and tastier.  After that day I decided not to make cake just with white flour, which has the highest gluten content.  Some wise man rightly said: Necessity is the mother of invention.

I am very happy to share with you all, my recipe for the marmalade cake made with rice flour.


Ingredients:

3 eggs, 1/2 cup sugar, 1/4 cup white flour(maida), 1/2 cup rice flour, 3/4 tsp baking powder, 1/2 tsp vanilla essence, 3 tbsp orange marmalade. 

Method:

Take a big pan, fill it with hot water. Now take another pan and place it in the hot water Put eggs and sugar in this pan and beat with electric beater (preferably)till it reaches creamy consistency. Take the pan out of the hot water.
Now add white flour, rice flour and baking powder little by little and mix it with a wooden spatula. When well blended add vanilla essence and mix it.
Grease a small cake pan. Pour the mix in it and bake in the oven 180 degree C (300 degree F)for 35 minutes or till wooden stick comes out clean. 
Take it out of oven. After ten minutes, take it out of the cake pan on a wire rack and let it cool off for an hour or so.
Now take out marmalade in a pan, add 2 tbsp of hot water and heat it till marmalade turns little liquid. Pour it on the cake.
 Enjoy with a cup of coffee or tea.


Friday, 8 February 2019

PICKLE AND MARMALADE OF TART SMALL ORANGES


Calamondin or little tart oranges is an important citrus hybrid predominantly cultivated in the Philippines.   It is native to the Philippines and surrounding areas in southern China, Taiwan, Borneo and Sulawesi.

Calamondin oranges are used for various medicinal purposes in Indonesia and Malaysia.  The juice is rubbed on insect bites and stings to relieve itching and irritation.  In the Philippines, the juice is used to bleach stains from the fabric.  Calamondin juice is taken for coughs and as an anti-inflammatory remedy.


These oranges grow up to be a bush but they can easily be grown in a pot in your yard or indoors.  If you live in an area where winters are harsh, grow this ornamental plant indoors but put it near the window with plenty of sun.  Take this plant outside during summer. In fact this plant is considered a good luck sign to grow in your home or garden.

These oranges have a sweet skin but very tart flesh. They can be made easily into spicy pickle or marmalade.  Some people use them raw in salads. Although I wonder how can it be eaten raw with that tangy bite under your teeth.  These oranges are a good source of vitamins, calcium, magnesium and sodium.

This plant was laden with fruits in my front yard. So I picked some fruits and made spicy pickle and marmalade. Both the items came out to my satisfaction. So here are the recipes I would want to share with you all.


MARMALADE

Ingredients:

Oranges 45, sugar 3 1/2 cups, water 2 cups, lemon juice 1 tsp, zest of lemon 1/4 tsp

Method:

Wash the fruit, wipe them down and cut into two parts. Take out the seeds. Put the flesh part in a bowl and cut the skin into small pieces. 
Mix lemon juice and zest with the flesh and pulp of oranges.  Lemon juice works like pectin for the marmalade. I try to avoid chemicals for the home made jams.
Put them in a pot with two cups of water for boiling. After the first boil add sugar to the pot. Reduce the flame to medium. After 15 to 16 minutes it will start to thicken.
Turn off the flame. It will solidify more after cooling off.
Once it reaches room temperature, you can put it in a sterilised bottle. Don’t close the lid till it completely cools off. You can refrigerate the marmalade and enjoy with your favourite bread.


SPICY PICKLE

Ingredients:

30 oranges, 1 1/2 tsp red chilli powder, 2 tbsp salt, 1/2 cup mustard oil,  1/4 tsp turmeric, 1/2 tsp dark brown mustard seeds, 1/8 tsp asafoetida(hing), 3/4 cup brown sugar or grated jaggery.

Method:

Wash, clean and wipe oranges with a dry cloth.
Make a plus sign on the top but do not slice all the way down.
Put these in a glass bowl and sprinkle turmeric, chilli powder and salt on these.
Heat oil in a pan, add asafoetida and mustard seeds. When mustard seeds stop spluttering, turn off the flame. Pour this hot oil on the spiced up oranges. 
You can sprinkle brown sugar now and mix well with a spatula.
Cover it.  When it comes on room temperature, transfer the pickle to a sterilised bottle.
Keep the bottle in the sun for 4 to 5 days so the sugar melts well.
Enjoy with your rice or parantha or any kind of bread.


Friday, 23 November 2018

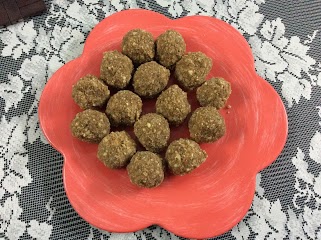
GOND LADDOOS: POWERHOUSE OF NUTRIENTS

In our childhood, Mom gave a Gond laddoo with a glass of warm milk for breakfast all through winters. I often asked: how come you give these tasty laddoos only in winters but never in the summer.  Mother always replied: these keep you warm in the winters and make your very smart in studies.

That struck in my mind. So other day I made these Gond (edible gum) and almond, walnuts, cashews and melon seeds laddoos but I wanted to find out the benefits in detail. What amazed me that something so tasty could be such a powerhouse of nutrients.

Gond or edible gum is the sap of the thorny shrub Tragacanth.  This gum is odourless, tasteless and water soluble mixture  and it is obtained from the sap of the plant and then dried.  This has medicinal properties and often used in ailments like  cough, cold and diarrhoea.  This has long been used as a binding and thickening agent by the food and pharmaceutical industry.   It is rich in calcium and protein and is excellent for people with lung related issues, weakness and fatigue. It also helps lactating mothers.

Other than Gond or edible gum, these laddoos have almonds, walnuts, cashews and melon seeds.  All these nuts contain lot of vitamins, minerals and anti oxidants. 
Almonds contain healthy fat, protein, fibre, magnesium and vitamin E.  Almonds help with lowering blood sugar level and managing your weight.
Cashews provide us with vitamins like E, K and B6 along with copper, magnesium, zinc, iron and selenium.  Eating cashews in moderation can do wonders to your health.
Walnuts are rich in Omega3 and helps in fighting heart disease.  Walnuts contain vitamin E, folate and anti oxidants.  They have neuroprotective compounds so they support the brain health.
Melon seeds provide us with Vitamins B1,B3, B6 and folate as well as vitamin K, potassium, magnesium, copper and fibre.

Now you can imagine if all the above mentioned ingredients are  put in a laddoo with wheat flour and ghee(clarifying butter), why won’t they become a powerhouse of nutrients and minerals, which we don’t get in our day to day dishes. These laddoos should not be taken more than one per day, although their taste tempts you to go for second or third helpings. They strengthen and nourish the bone tissues and wholesome nourishment for winters.


Here is my simple recipe of Gond Laddoos:

Ingredients:
1 1/4 cup wheat flour, 1 cup walnuts, 1 cup almonds, 1/2 cup cashews, 1/4cup melon seeds, 1 cup brown sugar, 1 cup ghee(clarifying butter), 1/3 cup gond(edible gum), 1/4 tsp cardamom powder(optional)

Method:

Heat 2 tbsp ghee in a pan, when ghee gets heated, lower the flame to sim. Fry Gond. It will pop like pop corns. Gond should always be fried on low flame otherwise it won’t cook from inside which can make stomach upset. Once all Gond is cooked, take it out in a plate. When it cools off, either crush it with pastel or grind it in a mixer.

In another pan on a low flame roast wheat flour without adding anything to it. It will take 7 to 8 minutes for it to roast well. Take it out and keep aside.

Now grind almonds in a mixer. You may leave them a bit coarse. Take these out. In the same grinder pulse walnuts, cashews and melon seeds. If you pulse it more than half a minute they will become powdery. Not that there is any harm in making it powdery. Mix all the ground nuts together.

Now in the first pan, pour rest of the ghee, heat it on medium flame. Add roasted wheat flour. Stir it for 2 minutes, add brown sugar and mix it well. Cook for two more minutes on low flame.  Now add ground nuts and crushed or ground Gond to it. Turn off the stove.  You may add cardamom powder to it. 

Let it cool off a bit, take a tbsp of mix at a time in your palm and make round ball. Make round balls of the whole mix and put them in an airtight container. Their shelf life is 2 to 4 weeks.

Note: some people like to fry nuts and then ground them. This enhances the taste but reduces the nutrient value of the nuts. 

Saturday, 17 November 2018

NO BAKE ORANGE PIE


Other day I got some oranges from the market. I generally like semi sweet and sour oranges. But this batch of oranges was way too tart, more than my teeth could handle. So I decided to turn these tart oranges into a dessert.

This dessert does not need any baking so it can be made very fast.  This is not made with any whipping cream, instead I have used hung yogurt or Greek yogurt, so you can enjoy this dessert without any guilt of adding calories.

This recipe is very simple.  You can make hung yogurt, ahead of time, by putting 1 litre of plain yogurt through a fine strainer for five six hours. Make sure you put it in the refrigerator during the straining process otherwise yogurt can turn a bit sour.


Ingredients for the pie crust
24 semi sweet Marie biscuits, 1 table spoon of extra virgin olive oil

Method for pie crust:
Powder the Marie biscuits in a grinder. Pour this powder on the base of the pie pan, drizzle the olive oil on it and press it with a spatula or your fingers. When it covers the pie pan, put it in the freezer for ten minutes. Your pie crust is ready.

Ingredients for the filling:

2 cups hung yogurt,  6 tsp honey( you may add or dercrease quantity of honey as per your taste), 1/4 cup orange juice, 1 tbsp white sugar,  orange pieces, 1/4 tsp of orange rind.

Method:
Take out the seeds from the orange pieces. In a pan put white sugar with one tsp of water. Add orange pieces. After boiling for five  seven minutes oranges will turn into sugary candy. Take them out and place them on a piece of parchment paper to cool off.

In the meanwhile, whip together hung yogurt, orange juice, orange rind and honey till mixture becomes smooth and well blended. Pour it in already prepared pie pan and freeze for a couple of hours or till it is set.


Before serving decorate with orange candied pieces. Enjoy this guilt free dessert.

Saturday, 1 September 2018

POTATOES WITH GARLIC AND CHIVES: a new twist

POTATOES WITH GARLIC AND CHIVES: a new twist

Potato is one vegetable which is eaten the world over.  It is everyone’s favourite. There is an old saying once there was a fight between a potato and Okra (lady finger).  Okra was so proud of her slim body she made fun of potato teasing him of being overweight Humpty Dumpty. Other vegetables didn’t like this so they extended their friendship to potato. Since then potato can be cooked along with any other vegetable, like onion potato,  spinach potato, squash potato, cauliflower potato, and many other combinations but okra stays alone.

Potatoes can be cooked in varied ways but here I am going for potatoes with garlic and chives. I am sure you have seen many recipes of potato and chives. Most people make it with red small potatoes, at times they are made with yellow/ cream potatoes too. Sometimes potatoes are mashed or even smashed a little. But I didn’t adopt any of these traditional methods. I gave a new twist to the age old recipe.


Ingredients:

4  medium potatoes, 1 big clove of garlic, 1 tbsp of dry chives or fresh chives,
1/2 tsp of lemon pepper, 1 1/2 tsp of bread crumbs, salt to taste, 1 1/2 tbsp of olive oil.

Method:

Boil potatoes. Once cool peel off the skin. Cut them into cubes.
Heat a bit one tsp of olive oil in a pan, add chopped garlic. 
 Now add potato cubes, salt, chives and lemon pepper.
Toss them for a minute and turn off the stove.
Now transfer these potatoes on a baking dish.
Sprinkle bread crumbs and left over olive oil on it.
Bake in 200 C(350F)  pre heated oven for 25 minutes.
Potatoes will be crispy and yummy. 
Enjoy as a snack or a side dish.


Sunday, 11 March 2018

QUESADILLA: all time Favourite Mexican dish


Quesadilla means a tortilla(chapati like bread) filled with cheese and mixture of cooked meats or vegetables, then folded and fried on the griddle.  Basically it is a turnover flat bread.

Quesadilla was developed when Spanish settlers came to Mexico in the 16th century.   Cheese was brought to America by the Spanish and other Europeans along with dairy products. Mexico had the tortillas. Some guys in Northern Mexico(parts of what is now Southwestern US) invented flour tortillas and started making quesadillas which started to gain popularity in the rest of US.


A quesadilla is a tortilla made with white flour or corn, filled with cheese and then folded into half or semi circle. It can have other ingredients but it should always have melting cheese inside.  Melting cheese works to glue two halves together.

Quesadillas have a universal appeal among the children. The combo of white or wheat flour tortilla and melted cheese is quite easy for kids to get attracted. The best part is, this dish is a win win situation even for mothers with kids who do not like to eat vegetables. Cooked vegetables or chicken can be stuffed along with melting cheese to provide nutrients of all food groups to your little ones.

I made my own wheat flour tortilla or chapati. Stuffed it with boiled potato, carrot and peas combo by adding some spices.   Placed cheese slice on the vegetables and folded into a semi circle. Then pan fried it by adding a half teaspoon of oil till it turned golden brown. Once cool a bit, cut into slices with pizza cutter or sharp knife.

Ingredients:
Wheat flour dough to make 4 chapatis.  2 medium size potatoes, 1 big carrot, 1/4 cup fresh or frozen peas, 1/2 tsp chaat masala, salt to taste, 1/2 tsp coriander powder, 1/2 tsp dry mango powder, 4 cheese slices, 1 tbsp of cooking oil or butter.

Method:
Take a small piece of dough, roll into a thin chapati, roast it on the griddle and put it aside. This is your wheat tortilla.
Boil potatoes, peel off and mash them. Then peel off carrot, cut into small slices and boil them along with peas. Drain the water. Now mix mashed potatoes, carrot and peas with spices. Let it sit for a few minutes. Divide into four parts. Take one part, spread inside a cooked chapati. Place a cheese slice by dividing into two parts. Fold it into a semi circle. Heat a non stick pan. Put 1/2 tsp of oil on the pan. Place the filled tortilla on it. Fry till golden brown. Flip the side and cook till golden brown .  Do the same with other three tortillas. Your quesadillas are ready. Cut into small slices and enjoy.

Sunday, 5 November 2017

JODHPURI MIRCHI VADA


Jodhpur, known as Blue City of Rajasthan, is rich in cultural heritage.  The graceful palaces,  monuments and temples strewn throughout the city bring alive the historic grandeur of this city.  This city offers multiple shopping options but to the connoisseur of good food this city is a heaven.

One afternoon we had just a gourmet samosa and a glass of sweet lassi(butter milk) and that was a filling lunch. I have eaten samosas from the different parts of the world but Jodhpuri samosa was par excellence. One night we had a Rajasthani thali for dinner. There were at least twenty dishes in my thali(plate) and it was hard to tell which dish was better than the other.  

One dish which left my taste buds tingling for more was a Jodhpuri Mirchi Vada.  I am not too crazy about peppers or Pakoras (dumplings made of chickpea flour) but this Mirchi Vada was a combination of both, yet its heavenly taste is etched in my memory.

I knew I had to recreate that dish in my own home. So this afternoon I exactly did that.
My husband who often judges my dishes rather critically, said : Your Mirchi Vada is even better than the one we ate at Jodhpur.  That compliment has inspired me to share the recipe on my blog.

So let us create the magic of gourmet Mirchi Vada Jodhpuri style.


Ingredients:

10 or 12 banana peppers,  2 cups besan (chickpea flour), 1/2 tsp turmeric, 1/8 tsp hing(asafoetida), 1 tsp dry mint leaves powder, salt to taste and water as needed,  a pinch of baking soda.  Oil for deep frying.

For Stuffing:

3 medium potatoes, 1/8 tsp hing, 1/2 tsp cumin seeds,  1 tsp cooking oil, salt to taste and mix of spices and 1/2 tsp of amchoor powder(dry mango powder)

Mix of Spices
Dry roast and ground the following spices to be added to the stuffing.

1 tsp cumin seeds, 1 tsp fennel, 1 tbsp coriander seeds and two whole red peppers

Method:

Wash and dry peppers and slit them vertically. Take out the seeds and put them aside.

Make batter with besan, turmeric, hing, salt and mint leaves. Add water but make sure batter is not too thick or not too thin. Mix well and leave it covered for 15 minutes.

In the meanwhile, prepare the stuffing for the peppers.  Boil, peel and mash potatoes.  In a pan, heat oil, add cumin seeds and hing. Once crackling of cumin stops, add mashed potatoes, ground spices and salt. Mix them well. Sauté on medium heat. Once it is well blended, turn off the flame and add amchoor powder. Mix it. Let it cool off.

Stuff this mixture into the already slit peppers. 

Wisk the batter one more time and add a pinch of baking soda. Mix well. Heat the oil for deep frying. Now dip every pepper into this batter and put in the very hot oil for deep frying till they turn golden brown.  Take them out on a paper towel so that excess oil drains out. 

Enjoy hot with green chutney or ketchup.